Why
There are many use cases of Docker. I see people primarily using it for Continous Integration and deployment. But Docker is also good for development. The obvious advantages of using Docker for development are:
- No need to install app dependencies on dev machines. App dependencies are built into Docker images. Hence, the dev machines are not messed up with crazy dependencies. The only dependency needed on dev machines is Docker, nothing else.
- Have a consistent development environment for all developers. No more excuse like "It works on my machine"!
- Onboard new developers quickly. No need to spend hours setting up new dev machine and configuring it. You only need
docker-compose upand you can start coding.
Prerequisites
This post will show you how to setup a Ruby on Rails development environment using Docker. My dev machine has
- OS X EI Capitan
- Docker version 1.10.1
- docker-compose version 1.6.0
Please note my Docker and docker-compose versions. If yours have lower versions, the example here will NOT work for you. In particular, I'm using docker-compose file Version 2, which are supported by Compose 1.6.0+ and require a Docker Engine of version 1.10.0+.
Architecture
The architecture of the app looks like this
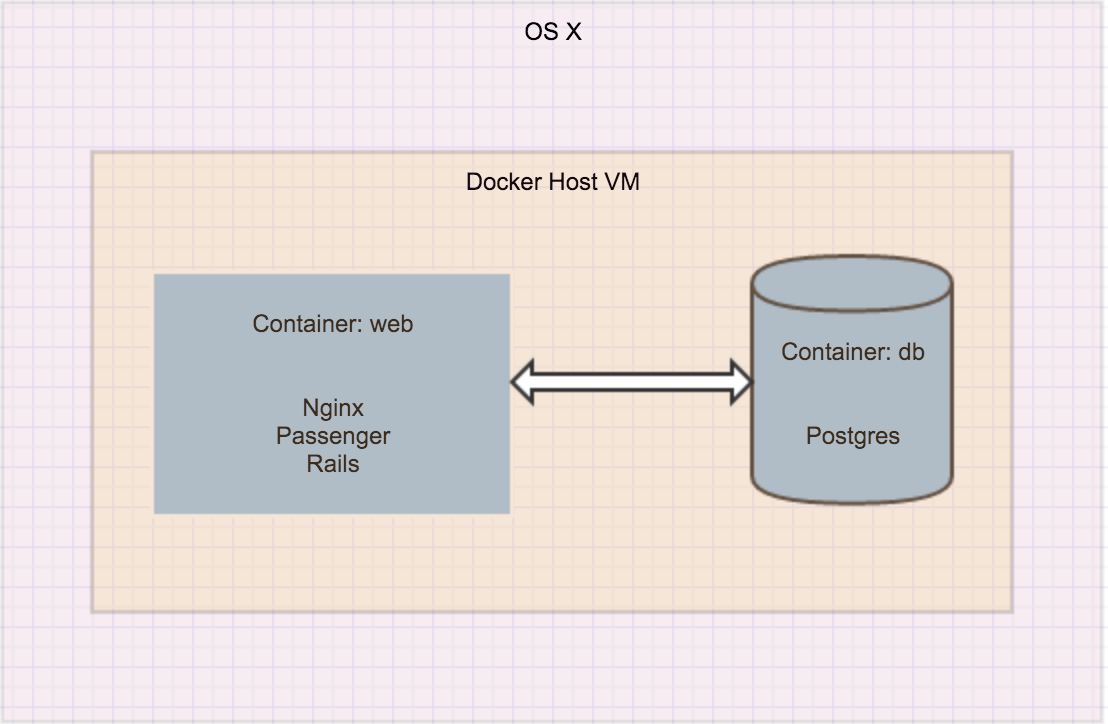
We have two containers, one for app and one for db. The web container has Nginx, Passenger and the Rails app. The db container only has Postgres in it. This architecture is probably common for many Rails apps running in production. And as a good practice, you should make your development environment as close to production as possible so that the potential production issues are exposed in the development stage, not when you receive calls from unhappy customers.
Build and Run Container Web
Step 1. Create Rails Project
My dev machine only has Docker installed. It doesn't have ruby. How do I create a Rails project? Use Docker.
docker run -it --rm --user "$(id -u):$(id -g)" -v "$PWD":/apps -w /apps rails:4.2.5 rails new rails_on_docker_for_dev --skip-bundle
The above command (btw, it's one line) will pull the image rails:4.2.5 from Docker Hub and run a one-off container based on the image with the command rails new rails_on_docker_for_dev --skip-bundle. The result is that it creates a Rails 4.2.5 project called rails_on_docker_for_dev in your current directory. Take a look at the newly created project rails_on_docker_for_dev.
Step 2. Dockerize the app
Create Dockerfile in the project
FROM phusion/passenger-ruby22:0.9.18
MAINTAINER Cheng Long <me@chengl.com>

# Hack to get around the volume mount issue on Mac
# https://github.com/boot2docker/boot2docker/issues/581
# https://github.com/docker/docker/issues/7198#issuecomment-159736577
ARG LOCAL_USER_ID
RUN usermod -u ${LOCAL_USER_ID} app

ENV APP_NAME rails_on_docker_for_dev

# Enable Nginx and add config
RUN rm -f /etc/service/nginx/down
RUN rm /etc/nginx/sites-enabled/default
COPY $APP_NAME.conf /etc/nginx/sites-enabled/$APP_NAME.conf

# Create project root and change owner
ENV APP_PATH /home/app/$APP_NAME
RUN mkdir -p $APP_PATH
RUN chown -R app:app $APP_PATH

WORKDIR $APP_PATH

RUN apt-get clean && rm -rf /var/lib/apt/lists/* /tmp/* /var/tmp/*

# Use baseimage-docker's init process.
CMD ["/sbin/my_init"]
This is a standard Dockerfile. It's based on phusion/passenger-ruby22:0.9.18, which includes Nginx 1.8.0, Passenger 5.0.22 and Ruby 2.2. It basically has all the dependencies to run the container web. You probably notice that the image doesn't include the Rails app. That's because we want to mount the Rails app as a volume so that when we edit source code of the app we don't have to rebuild the image. This is much needed in development mode to shorten the feedback loop. But in production, you should include the app in the image. We will see how it's mounted in docker-compose.yml
Two lines in the Dockerfile need a bit explanation
ARG LOCAL_USER_ID
RUN usermod -u ${LOCAL_USER_ID} app
First, Passenger recommends running the app as user app because it's a good security practice. So user app needs rw access to the mounted volume.
Second, in order to let app have rw access and not to change the ownership of the files (because we want to edit the source code on local machine and the files are owned by the local user), we change app's uid to be the same as the local user. This is a trick to get around the permission issue of mounted volume on OS X.
Create rails_on_docker_for_dev.conf
server {
    listen 80;
    server_name 0.0.0.0;
    root /home/app/rails_on_docker_for_dev/public;

    passenger_enabled on;
    passenger_user app;
    passenger_ruby /usr/bin/ruby;
    passenger_app_env development;
}
Note passenger_user app;, the app is running as app not root.
Create docker-compose.yml
version: '2'
services:
  web:
    build:
      context: .
      args:
        - LOCAL_USER_ID=${LOCAL_USER_ID}
    ports:
      - "80:80"
    volumes:
      - ".:/home/app/rails_on_docker_for_dev"
Note the volumes part. We mount the project directory in the local dev machine as a volume to /home/app/rails_on_docker_for_dev inside the container so that the container has the source code and Rails auto-reloading still works.
Step 3. Build and Run
Build the image
LOCAL_USER_ID=$(id -u) docker-compose build
We need LOCAL_USER_ID=$(id -u) because docker-compose.yml expects an environment varialbe LOCAL_USER_ID so that it can change user app's uid to the local user's uid.
Run the image
docker-compose up
You will see some logs that Passenger prints out in the console. When it's ready, point your broswer to your docker machine ip. To find out your docker machine ip, docker-machine ip default, if you are using machine default.
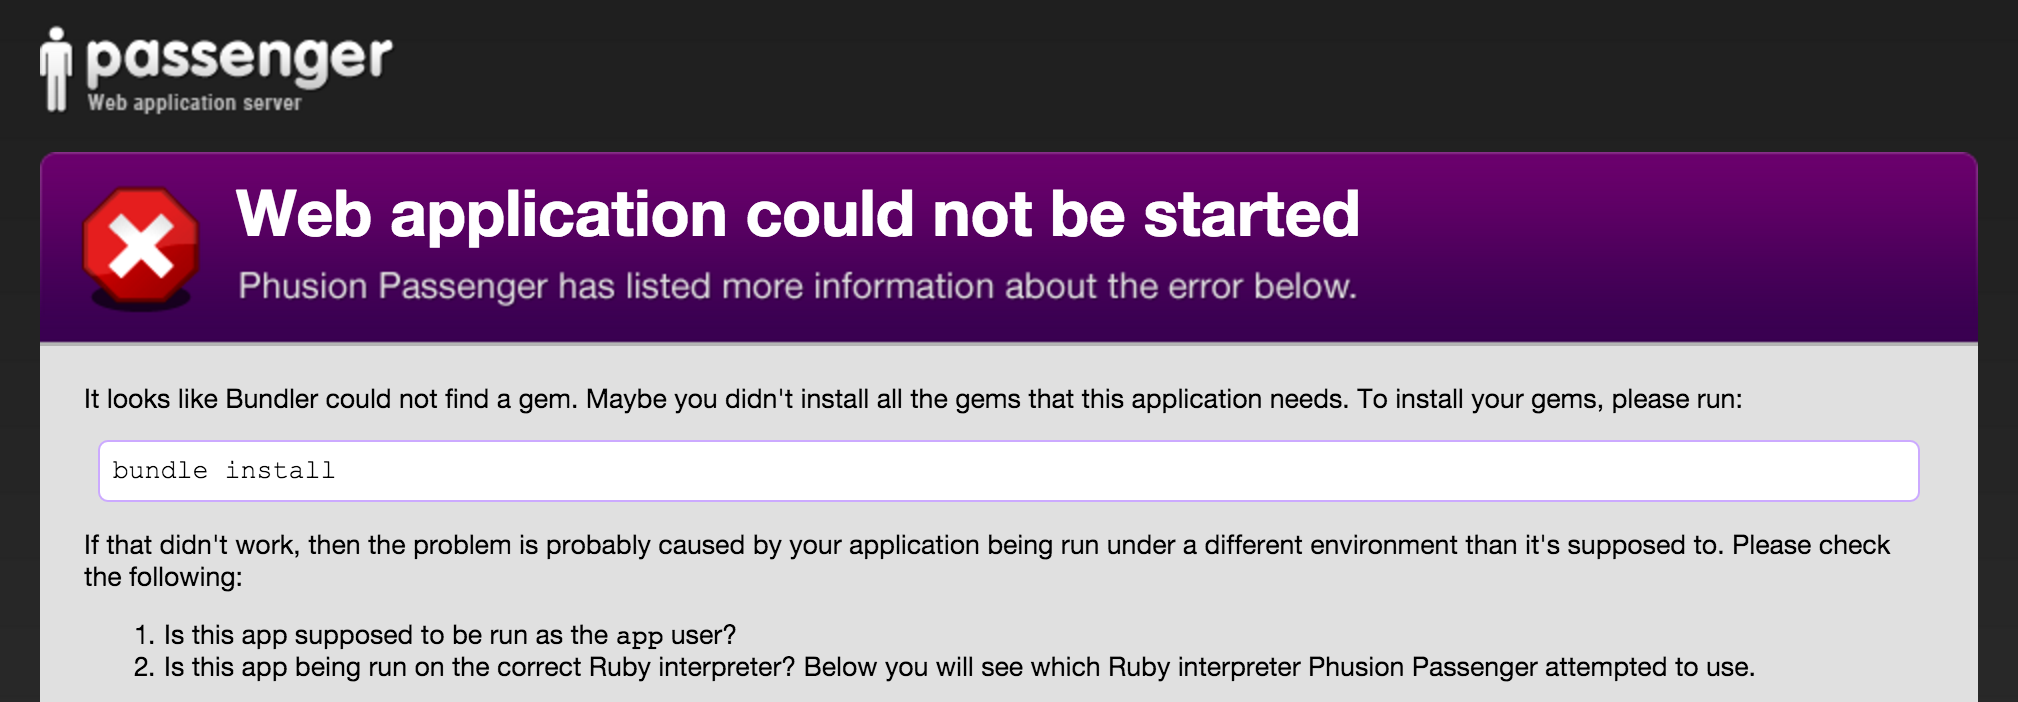
You should see an error that Passenger complains about bundle install is not run yet. That's correct. The app doesn't have any gem yet.
First Bundle install
docker-compose run --rm --user $(id -u):$(id -g) web bundle install --path=vendor/bundle
We want to install gems in ./vendor/bundle because the gems will persist in ./vendor/bundle regardless of the lifecyle of the container. When we update the Gemfile and do bundle install again, it will only install the newly added gems, not everything again.
--user $(id -u):$(id -g) is to make sure that newly created files are owned by the local user. Without it, they will be owned by root.
--rm is to remove the container after it's done.
Remove the running container
docker rm -f $(docker ps -ql)
Run the image again
docker-compose up
If you refresh your broswer, you should see a familiar welcome page!
Step 4. Develop using Docker
Having only a welcome page is not very exciting. Let's add a Post model.
docker-compose run --rm --user $(id -u):$(id -g) web bundle exec rails g scaffold post title:string body:text
DB migrate
docker-compose run --rm --user "$(id -u):$(id -g)" web bundle exec rake db:migrate
Now you can CRUD posts. Everything works!
Build and Run Container DB
Step 5. Replace sqlite3 with pg
Replace sqlite3 with pg in Gemfile
gem 'pg', '~> 0.18.4'
bundle install
docker-compose run --rm --user $(id -u):$(id -g) web bundle install --path=vendor/bundle
Step 6. Update Web Image
Add Postgres dependency in Dockerfile
RUN apt-get update && apt-get install -qq -y libpq-dev --fix-missing --no-install-recommends
Update docker-compose.yml so that web and db are linked
version: '2'
services:
  web:
    build:
      context: .
      args:
        - LOCAL_USER_ID=${LOCAL_USER_ID}
    ports:
      - "80:80"
    volumes:
      - ".:/home/app/rails_on_docker_for_dev"
    links:
      - db

  db:
    image: postgres:9.4.5
    ports:
      - '5432:5432'
Update database.yml to use Postgres
development: &default
  adapter: postgresql
  encoding: utf8
  database: myapp_dev
  pool: 5
  username: postgres
  host: db

test:
  <<: *default
  database: myapp_test
Step 7. Rebuild images and Run
LOCAL_USER_ID=$(id -u) docker-compose build
Run
docker-compose up
You should see logs from both web and db printed in the console.
Of course, you should setup database first
docker-compose run --rm --user "$(id -u):$(id -g)" web bundle exec rake db:setup
Everything works as before!
All source code is here.
Summary
As you see, it's not that hard to use Docker for Rails development. Essentially, we just need Dockerfile anddocker-compose.yml and link the containers properly. The development workflow with Docker is pretty much the same as without Docker. But the advantages that Docker brings to development are invaluable. It abstracts away the difference between local dev machines and let every developer in your team have a consistent development environment. Isn't that awesome?
Happy Dockering!