This is my second post on Docker orchestration. In the first post, I demonstrated orchestrating Docker with Swarm, Machine, Compose and Consul. This post is to demonstrate orchestrating the same app with Kubernetes and draw comparisons between them. I recommend reading that post before this.
Introduction to Kubernetes
Kubernetes is an open-source system for automating deployment, operations, and scaling of containerized applications.
It groups containers that make up an application into logical units for easy management and discovery. Kubernetes builds upon a decade and a half of experience of running production workloads at Google, combined with best-of-breed ideas and practices from the community.
Find out more here.
Kubernetes has a number of interesting concepts:
Kubernetes is definitely not a trivial tool. Luckily, the official guides does a great job at explaining things. I highly recommend going through it to learn Kubernetes.
Architecture
This is a much simplified version of the architecture.
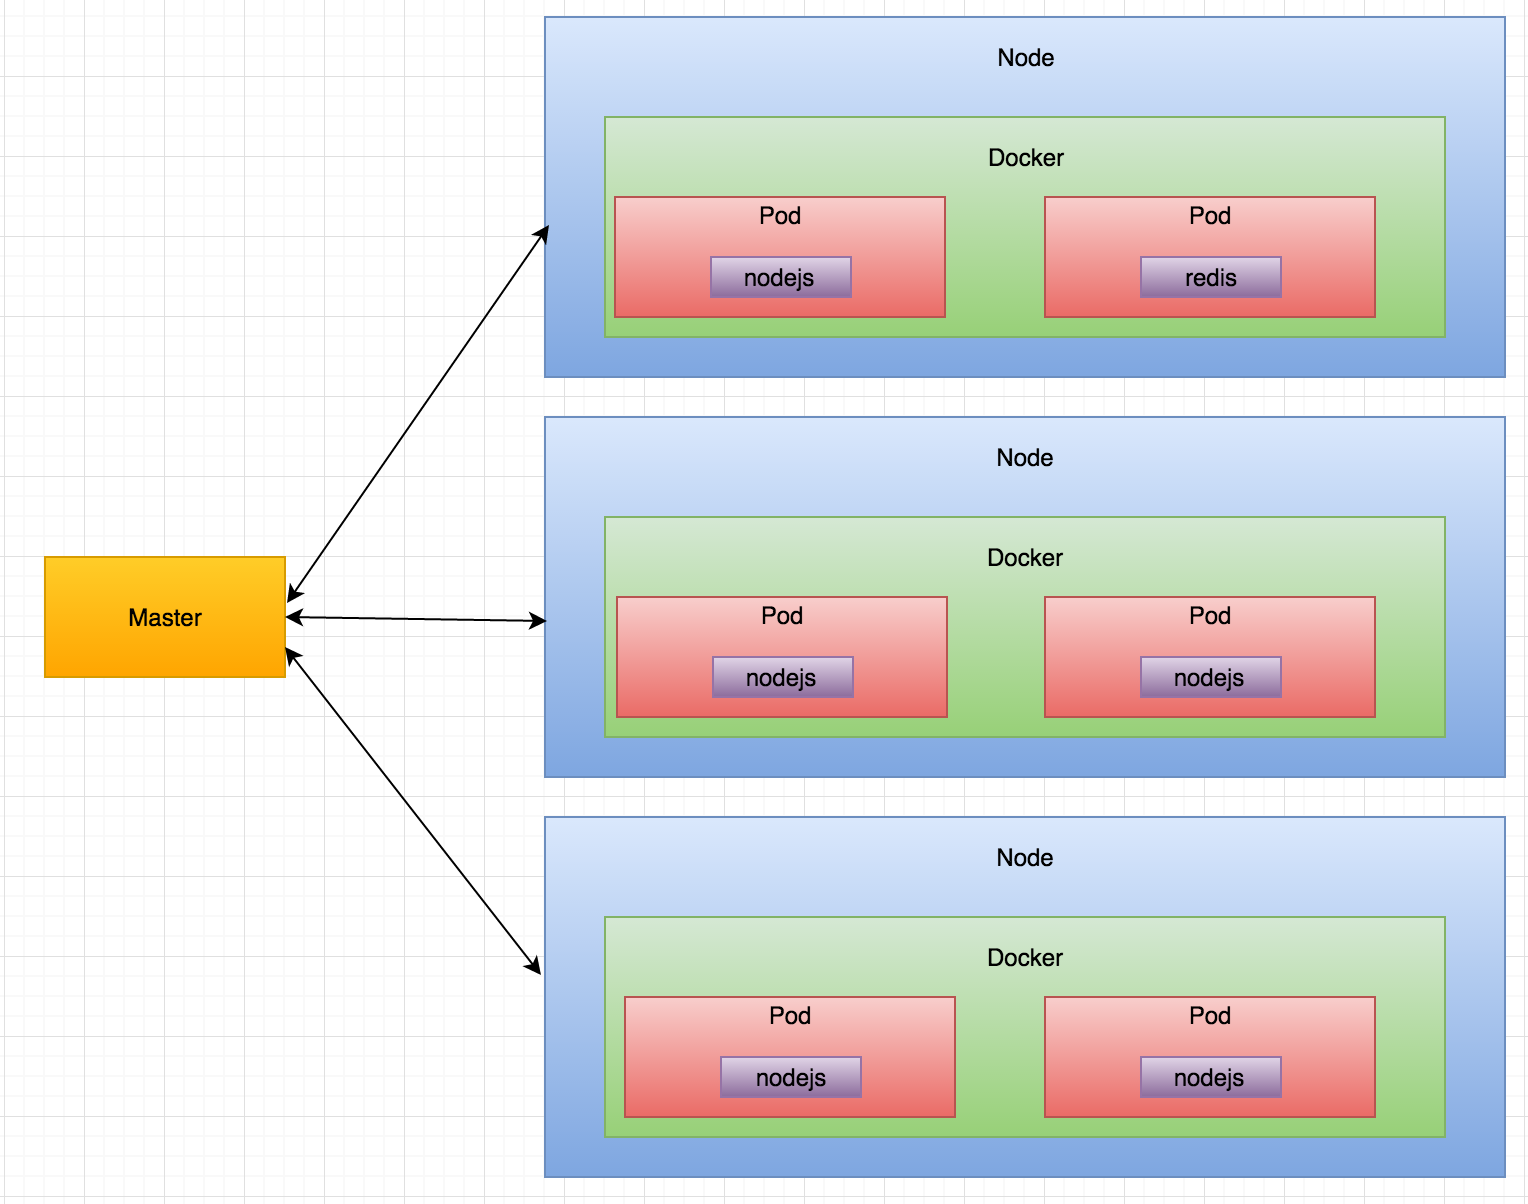
Neither load balancer nor service discovery is in the diagram because they are both handled by Kubernetes internally. See Kubernetes' architecture here.
For this demo, I will use Google Container Engine as a hosted solution. You can run Kubernetes on various platforms, including local machine, Cloud IaaS providers, bare metals, etc. By the way, Google Cloud Platform gives $300 in the 60-day free trial. Try it out!
0. Prerequisites
This example requires a running Kubernetes cluster. If you want to use Google Container Engine, follow this. Or let gcloud init guide you.
Verify kubectl is configed and the cluster is ready
kubectl cluster-info
1. Run backend
According to the best practices, create a Service before corresponding Deployments so that the scheduler can spread the pods comprising the Service. So the redis service is created before deployment and they are defined in backend.yaml.
kubectl create -f backend.yaml
Verify the service is created
$ kubectl get services redis
NAME      CLUSTER-IP     EXTERNAL-IP   PORT(S)    AGE
redis     10.7.246.226   <none>        6379/TCP   7m
Verify the deployment is created:
$ kubectl get deployments
NAME      DESIRED   CURRENT   UP-TO-DATE   AVAILABLE   AGE
redis     1         1         1            1           53s
Verify one redis pod is created
$ kubectl get pods
NAME                     READY     STATUS    RESTARTS   AGE
redis-3180978658-4y13o   1/1       Running   0          3m
See the pod's logs
kubectl logs redis-3180978658-4y13o
2. Run frontend
Create frontend by
kubectl create -f frontend.yaml
Note that I specify type: LoadBalancer because I want this service to be accessible by the public. By default, services and pods are only accessible inside the internal Kubernetes network. Also, the Nodejs deployment will maintain 3 pods, each runnning one container based on this Docker image chenglong/simple-node:v1.
You can verify that the service and deployment for Nodejs are created correctly in the same way as backend. If everything goes well, the app should be up and running. If you do kubectl get pods, there should be 3 frontend pods and 1 backend pod.
Get the external IP
$ kubectl get service frontend
NAME       CLUSTER-IP     EXTERNAL-IP       PORT(S)   AGE
frontend   10.7.246.128   104.155.202.254   80/TCP    8m
You need to wait a while for the external IP to be available. Repeat curl <EXTERNAL-IP> a few times to verify that both load balancing and page counting work. You can also see the page in browser.

3. Self-healing
One important feature Kubernetes offers out of the box is self-healing. Put simply, Kubernetes will ensure that the specified number of replicas are running. In the event of pods or nodes fail, Kubernetes recreate new ones.
To test this feature, I delete one frontend pod and immediately list all pods.
$ kubectl delete pod frontend-2747139405-bk4ul; kubectl get pods
NAME                        READY     STATUS              RESTARTS   AGE
backend-3180978658-i1ipl    1/1       Running             0          13m
frontend-2747139405-bk4ul   1/1       Terminating         0          8m
frontend-2747139405-hjnb9   1/1       Running             0          39s
frontend-2747139405-luukn   0/1       ContainerCreating   0          3s
frontend-2747139405-mfhky   1/1       Running             0          8m
From the pods status, frontend-2747139405-bk4ul is terminating. But notice that there is a new pod frontend-2747139405-luukn automatically being created.
4. Scaling
Scaling the frontend is as simple as
$ kubectl scale deployment/frontend --replicas=6; kubectl get pods
deployment "frontend" scaled
NAME                        READY     STATUS              RESTARTS   AGE
backend-3180978658-i1ipl    1/1       Running             0          41m
frontend-2747139405-4xhlz   0/1       ContainerCreating   0          4s
frontend-2747139405-autox   0/1       ContainerCreating   0          4s
frontend-2747139405-hjnb9   1/1       Running             0          28m
frontend-2747139405-luukn   1/1       Running             0          27m
frontend-2747139405-mfhky   1/1       Running             0          36m
frontend-2747139405-r8ayi   0/1       ContainerCreating   0          4s
As seen from the above, Kubernetes immediately starts creating new replicas to match the desired state.
Scaling down is similar
kubectl scale deployment/frontend --replicas=3
Depending on the nature of the app, it's probably more useful to define Horizontal Pod Autoscaler to do autoscaling.
5. Rolling update
Suppose we need to update the frontend app to chenglong/simple-node:v2. Right now it's v1. How to roll out this release without service disruption? Kubernetes supports this natively and makes it simple.
To reduce risk, I want to do a Canary Release first. Create the canary deployment
kubectl create -f frontend-canary.yaml
Note that I set replicas: 1 so that the ratio of stable pods to canary pod is 3:1. And since the canary has labels app: nodejs and tier: frontend, it will be automatically load balanced by the frontend service.
List all pods with label track
$ kubectl get pods -L track
NAME                               READY     STATUS    RESTARTS   AGE       TRACK
backend-3180978658-23la7           1/1       Running   0          11m       <none>
frontend-1287392616-0lfxx          1/1       Running   0          9m        stable
frontend-1287392616-95b6q          1/1       Running   0          7m        stable
frontend-1287392616-bpstl          1/1       Running   0          9m        stable
frontend-canary-1722551660-6aaon   1/1       Running   0          5m        canary
Verify the deployment works
$ kubectl get deployments frontend-canary
NAME              DESIRED   CURRENT   UP-TO-DATE   AVAILABLE   AGE
frontend-canary   1         1         1            1           3m
Hit the frontend service a few times to verify that only one pod is updated to chenglong/simple-node:v2
$ curl <EXTERNAL-IP>
This request is served by frontend-canary-1722551660-o4qcu
You have viewed this page 20 times!
Server Time: 2016-05-15T11:30:08.649Z

$ curl <EXTERNAL-IP>
This request is served by frontend-1287392616-wgl39. You have viewed this page 22 times!
Since the Canary Release is working fine, I want to roll out to all pods.
$ vim frontend.yaml # update simple-node:v1 to simple-node:v2
$ kubectl apply -f frontend.yaml
Kubernetes will progressively kill old pods and create new pods. It does not kill old Pods until a sufficient number of new Pods have come up, and does not create new Pods until a sufficient number of old Pods have been killed. Find out more here.
Find out details of one of the none-canary pods. Note that the image is chenglong/simple-node:v2 not v1.
$ kubectl describe pods frontend-1389432169-aszzd
Name:		frontend-1389432169-aszzd
Namespace:	default
...
Containers:
  nodejs:
    Container ID: docker://faf884e2da293f6de66e275614d...
    Image:		chenglong/simple-node:v2
Delete Canary deployment
$ kubectl delete deployments frontend-canary
deployment "frontend-canary" deleted
If this release is not ideal, we could easily roll back
$ kubectl rollout undo deployment/frontend
deployment "frontend" rolled back
Kubernetes vs Swarm
Based on the previous post and this one, it's clear to me that there're quite a few prominent differences between Kubernetes and Swarm:
- Kubernetes is a more mature and powerful orchestration tool than Swarm. Swarm provides basic and essential native clustering capabilities. But Kubernetes has built-in self-healing, service discovery (etcd), load balancing, automated rollouts and rollbacks, etc. Building all these functions on Swarm is not trivial. However, this may or may not be a good thing depending on use cases. If you do need all the features that Kubernetes provides and don't intend to do any customization, Kubernetes is perfect for you. Otherwise, the complexity of Kubernetes might become a burden because it requires more efforts to adopt and support.
- Different philosophies. Kubernetes has clearly taken an all-in-one approach, while Swarm is batteries included but swappable. So if I want to use Consul as the service discovery backend, I can easily do that in Swarm. But Kubernetes uses etcd by default and it's still not supported after more than one year..
- Kubernetes is primarily based on Google's experience on managing containers. So it's opinionated by definition. I'm not saying being opinionated is necessarily bad. But if you do decide to use it, you probably have to live with its choices. Consul is just one example.
- Command Line. Unlike Swarm, Kubernetes is not native to Docker. It has its own set of commands. See the the differences here. But in general,
kubectlis quite similar todocker-cli. - Swarm performs better than Kubernetes. I think this only matters when you are running hundreds or even thousands of nodes and containers. At a small to medium scale, other factors (e.g the points above) play a more important part when deciding which one to use.