With multi-host networking ready for production and the announcement of Swarm 1.0, I think it's time to give Docker a serious try. This post details the steps I took to orchestrate a multi-host and multi-container app.
Architecture
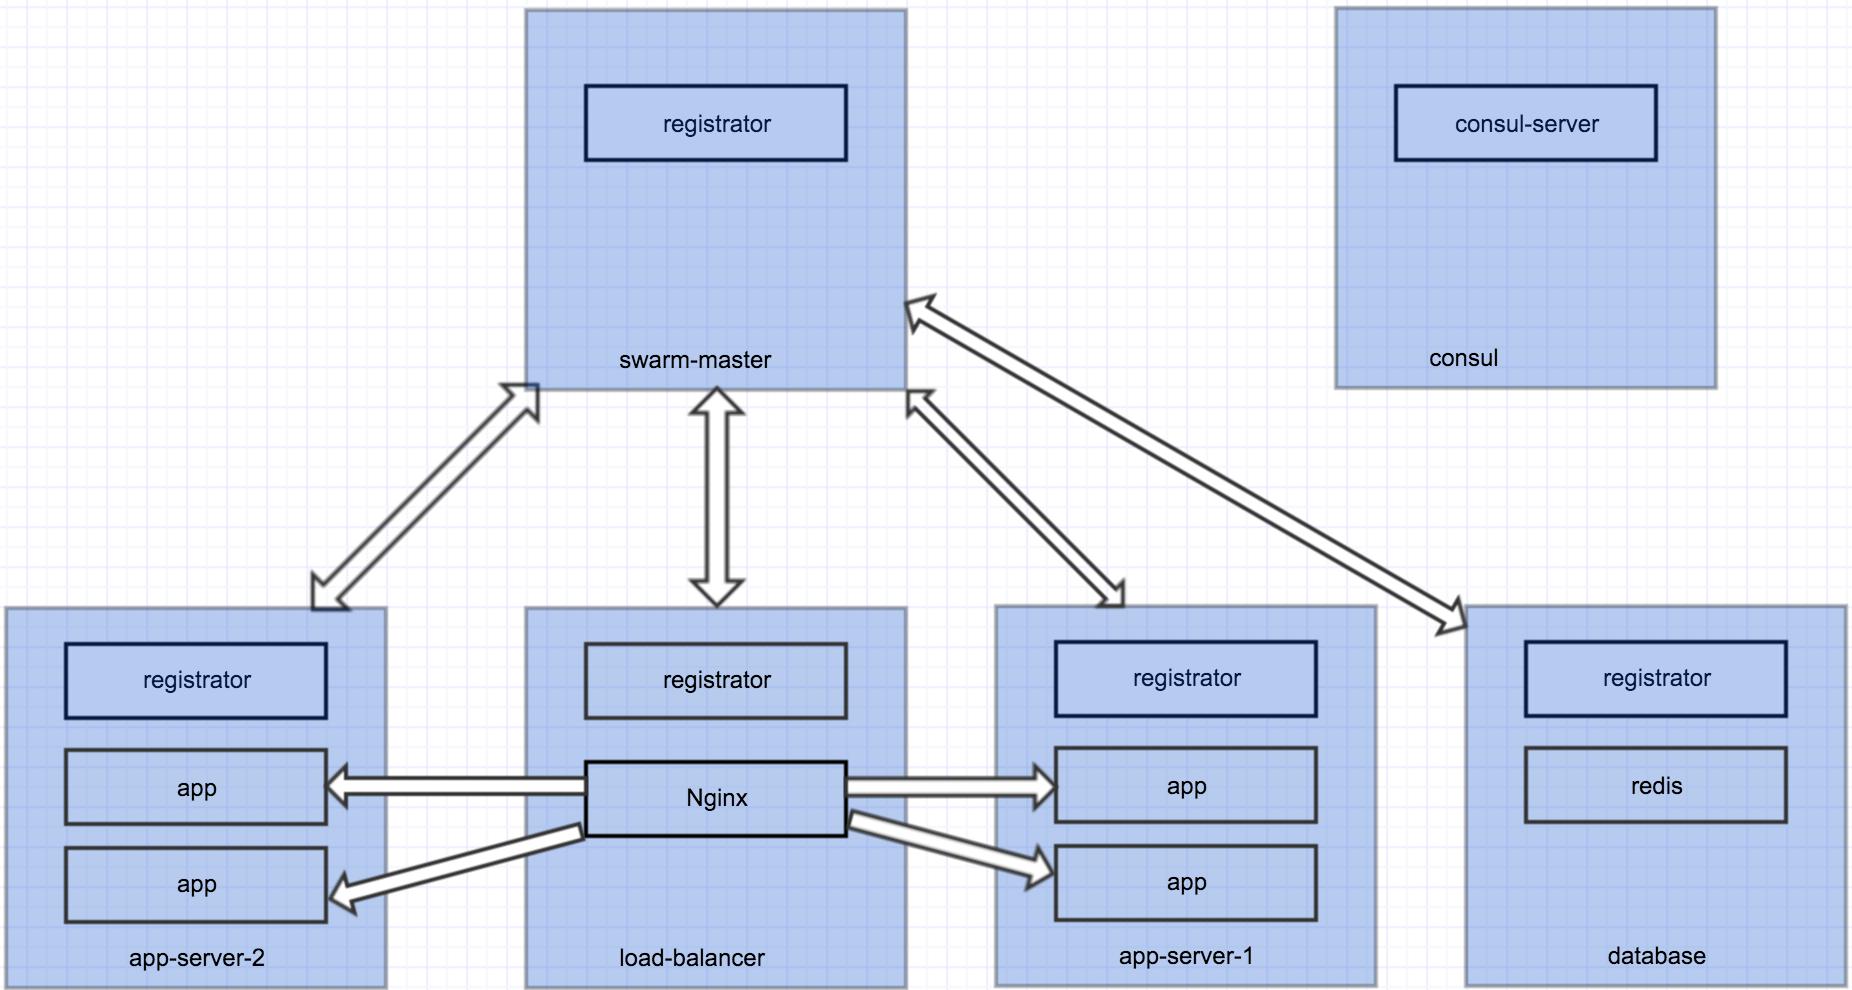
This is a simple Node app that uses Redis as database, load balanced by Nginx. Each blue box is a Docker host, which runs several containers. All hosts talk to Consul for service discovery. The cluster has 5 nodes, each serves a specific purpose. We want to easily scale up and down the number of app containers.
To achieve this, we will use the following stack
- Docker Compose >= 1.6
- Docker Machine >= 0.6
- Docker Swarm >= 1.0
- Consul
- Registrator
All scripts and the compose file for this demo are available here.
1. Create and Run Consul
Consul is an excellent tool for service discovery. It works great with Docker. You could also use etcd.
Let's create a Docker host for Consul
docker-machine create -d virtualbox consul
This will create a new Docker host named consul on my local virtualbox. It's certainly possible to create a Docker host on a supported cloud provider, e.g. AWS, Digital Ocean, Google Compute Engine, etc. The difference is the driver. Checkout driver options and arguments.
Once consul is created, connect to it
eval $(docker-machine env consul)
Run progrium/consul in background.
docker run -d -p 8500:8500 -h consul --restart always gliderlabs/consul-server -bootstrap
Verify Consul is working
curl $(docker-machine ip consul):8500/v1/catalog/services
You can also go to Consul's web UI http://$(docker-machine ip consul):8500/ui
2. Create The Swarm
Create the Swarm master
docker-machine create \
    -d virtualbox \
    --swarm \
    --swarm-master \
    --swarm-discovery="consul://$(docker-machine ip consul):8500"\
    --engine-opt="cluster-store=consul://$(docker-machine ip consul):8500" \
    --engine-opt="cluster-advertise=eth1:2376" \
    swarm-master
This is a very long command. Let's take a detailed look.
-d virtualboxindicates the driver is virtualbox--swarmconfigs the newly created machine with Swarm--swarm-masterdictates the newly created machine as the Swarm master--swarm-discovery="consul://$(docker-machine ip consul):8500"designates Consul as the discovery service--engine-opt="cluster-store=consul://$(docker-machine ip consul):8500"designates Consul as the distributed KV storage backend for the cluster--engine-opt="cluster-advertise=eth1:2376"advertises the machine on the network
Create a node for load balancer
docker-machine create \
	-d virtualbox \
    --swarm \
    --swarm-discovery="consul://$(docker-machine ip consul):8500"\
    --engine-opt="cluster-store=consul://$(docker-machine ip consul):8500" \
    --engine-opt="cluster-advertise=eth1:2376" \
    --engine-label host=load-balancer \
    load-balancer
Note that we give this machine a label host with value load-balancer, which will be used for scheduling later.
Create app server 1
docker-machine create \
	-d virtualbox \
    --swarm \
    --swarm-discovery="consul://$(docker-machine ip consul):8500"\
    --engine-opt="cluster-store=consul://$(docker-machine ip consul):8500" \
    --engine-opt="cluster-advertise=eth1:2376" \
    --engine-label host=app-server \
    --virtualbox-cpu-count "2" \
    --virtualbox-memory "2048" \
    app-server-1
Note the two added parameters --virtualbox-cpu-count "2" and --virtualbox-memory "2048", which gives the app server more resources. You should adjust these values according to your needs.
Create app server 2
docker-machine create \
	-d virtualbox \
    --swarm \
    --swarm-discovery="consul://$(docker-machine ip consul):8500"\
    --engine-opt="cluster-store=consul://$(docker-machine ip consul):8500" \
    --engine-opt="cluster-advertise=eth1:2376" \
    --engine-label host=app-server \
    --virtualbox-cpu-count "2" \
    --virtualbox-memory "2048" \
    app-server-2
It's best practice to put your app servers in different availability zones or even different cloud providers to achieve high availability. Checkout the drivers reference for options.
Create database node
docker-machine create \
	-d virtualbox \
    --swarm \
    --swarm-discovery="consul://$(docker-machine ip consul):8500"\
    --engine-opt="cluster-store=consul://$(docker-machine ip consul):8500" \
    --engine-opt="cluster-advertise=eth1:2376" \
    --engine-label host=database \
    --virtualbox-disk-size "40000" \
    database
Note that we specify --virtualbox-disk-size "40000" because it's for running database. You can adjust this according to your needs.
Connect to the Swarm
eval $(docker-machine env -swarm swarm-master)
Check cluster info
docker info
You should see 5 nodes in the cluster, namely swarm-master, load-balancer, database, app-server-1 and app-server-2.
You can also run
docker run --rm swarm list consul://$(docker-machine ip consul):8500
to find out all nodes in the cluster.
3. Run registrator in each host
To automatically register and deregister services for all Docker containers in each host, we need to run gliderlabs/registrator in each node of the cluster. Registrator will also use Consul as the KV store.
Run the following script
After this, the infrastructure is ready. It's time to deploy.
4. Docker Compose
We will use the following compose file to start the app
A few important points:
- chenglong/nginx-consul-template is a simple image that use NGINX and consul-template to load balance any service as instructed. In this case, it's service
myapp. It requires a running Consul for service discovery. Environment variableCONSUL_URLshould be set. - chenglong/simple-node is a simple Node image that uses redis as database. All it does is to display the hostname and the number of times the page is visited.
constraint:host==load-balancer,constraint:host==app-serverandconstraint:host==databaseare node filters which tell the Swarm master to schedule the corresponding containers on matching hosts. So in this case, theload-balancercontainer will be scheduled to run on Docker hostload-balancer. Allappcontainers will be scheduled to run on eitherapp-server-1orapp-server-2.- There are two overlay networks
frontendandbackend. This is what makes multi-host networking possible, i.e.load-balancercan talk toappandappcan talk toredis.
Set CONSUL_URL
export CONSUL_URL=$(docker-machine ip consul):8500
Start the app
docker-compose up -d
Verify that all containers are running
docker-compose ps
Test the app works by repeating curl $(docker-machine ip load-balancer) a few times. You should see the counter running.
5. Scaling
Now you can easily scale the number of app containers
docker-compose scale app=4
This creates 3 more app containers.
By default, Swarm use spread scheduling strategy. So all app containers will be shared evenly by app-server-1 and app-server-2.
Test load balancing works by repeating curl $(docker-machine ip load-balancer) a few times. You should see the hostname cycles the 4 containers and the counter is running.
Scaling down is easy too
docker-compose scale app=2
Summary
With Docker Swarm, Machine, Compose and Consul, it's not hard to scale and schedule Docker containers to a cluster of nodes. Although I demoed with virtualbox, you could do the same with Digital Ocean, AWS or any supported cloud provider to deploy Swarm clusters for production.
Since Swarm is native for Docker and it follows "batteries included but swappable" principle, I feel it's much more natural and easier to use than Kubernetes. I will try to do a post about Swarm vs Kubernetes in the near future.